
Today I have some Christmas nail art stickers and water decals to share with you, and these are from Viva la Nails. They are a lovely company based out of the UK that deals with nail supply items. Viva la Nails website isn't just another site that sells nail care, nail art, nail polish etc. sort of supplies. They also give you some of the latest nail care technology to improve your nail product stash. Their website is very easy to navigate around, so you won't get lost trying to find items that you may want.

I received six sheets: three water decals, and three nail art stickers; for review.
As I was looking through the nail art decorations, I was shocked with how adorable these looked. Several designs on one sheet is more than enough to do two looks, pending how you decide to do your nails. Not to mention you could always mix them up.

It is nice to see them in their own little sheet holder. On the front of the cardstock you could see their lovely logo. Did I forget to mention to you, purple and pink is one of my favorite color combos? So win on their logo instantly!

Each sheet is tucked into corner slits on the card stock so it won't shift during shipping or while it is in your nail art stash. I like this method more than the typical in an envelope or there is some sort of sticky residue on it stuck to the package etc. There were no issues of removing it from the plastic envelope none of the decals got stuck to it. Nor any issues of any sticky product holding it in the cardstock.

The top three are the water decals, and the bottom three are nail art stickers. How cute does this look? I love the 3D ornaments they're puffy! It reminds me of marshmallows in Lucky Charms for some reason. I love the glitter nail art sticker of the snowmen. They're all just too cute for words!
For a nail art sticker it is easy to use and place on. Simply peel back the sheet a little to lift up the sticker, and position it upon your nail. Be careful that you do not position it wrong. It could peel your base off when you try to re-adjust it. Seal in the sticker with a top coat.
Nail art decorations that are water decals, take a little bit more time. Despite that issue I love water decals loads since they are super easy to use.
Here is a quick tutorial on how to use water decals:
Basically what you need:
- A cup/bowl of water obviously
- Scissors
- Your nail art water decal sheet. NOT STICKERS!
- Paper towel or tissue
- Tweezers is optional
- Your nails done
- Top Coat nail polish to seal your decal in.
What I mean by your nails done is basically your base color.
Before you begin removing the plastic sheath layer that is located on top of the nail art water decals if there is one. If you do not remove it, the image might attach to the plastic sheath and you will not be able to remove it. So make sure you take it off before you begin dipping the water decal into the bowl of water. Next cut out the design you want for each finger and set them to the side. Dip your decal into the water carefully, and let it sit in there for a few seconds. Be sure that your decal does not bob to the bottom or side. You'll have issues trying to lift it out. Take out the decal with tweezers or you could use your finger. Make sure to grab on to the excess sheet around the image and not grab onto the image directly. Slide the paper back and you will see the image upon your finger. With the image finger angle it right to where you would want it on your nail. Like how you use a stamper from a stamp plate rock your finger left and right in that area to put it. Dab off any excess water that may be on it with a paper towel or tissue paper. Afterwards seal it with your favorite topcoat.
The nail art stickers were no issue at all with removing them from the sheets. And I found their water decals to slide off the sheet and on to my finger. Also no smearing had occurred with the images as well, after I place the top coat on.
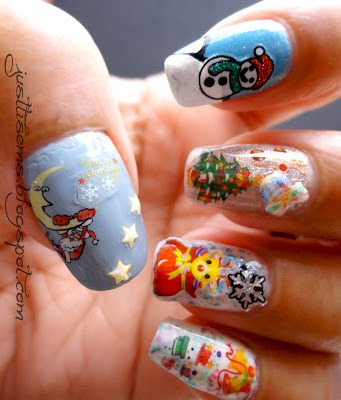
I decided to use an image from each sheet to do my nails. Could you believe this is my first Christmas mani for this year?! Well it is! As soon as I saw the nail art decorations I knew what I wanted to do with them.

My pointer finger was inspired by my girl Alice's snow scene nails. For my ring finger I did a sandwich of glitters (Milani One Coat Glitter Twinkle & Milani Nail Lacquer Teal) between Sally Hansen Complete Salon Manicure Polar Bare.
Polishes used:
- Milani Nail Lacquer Beach Front
- Zoya Kristen
- Milani High Speed Fast Dry White on the Spot
- Color Club Age of Aquarius
- Zoya Tru
- Color Club Cherubic
- Milani One Coat Glitter Twinkle
- Milani Nail Lacquer Teal (Glitter)
- Sally Hansen Complete Salon Manicure
- Orly Bonder
- Seche Vite Fast Dry Top Coat

I love how the 3D nail art sticker of the ornaments stood out. The nail art stickers and water decals were the perfect size for your nail beds. Some may be a tad bigger than your pinky though.
Each sheet cost £1.95 each, which is basically about $2.58 each. Still a great price considering how much some nail art stickers are that you find at Walmart. Nice quality! And not to mention their site has a wide range of items! From nail art water decals to nail polish to acrylic powders. Basically all your nail essential needs! Their shipping is pretty cheap too! $3.90 for orders under $66, and free shipping for orders over it. The shipping only took about a week to get to me! Viva la Nails has very friendly customer service, so if you have a question feel free to ask them.
Which do you prefer water decals or nail art stickers? Have you tried out Viva la Nails' products before?
I hope you enjoyed this post and have a wonderful day lovely!